
When designing our toddler’s first “big girl” bedroom, we knew it had to be special. We knew that if she didn’t love it from the get go, the transition to her own room and her own bed would be much more of a challenge.
Inspired by our love of the outdoors, we decided on an outdoor-themed bedroom.
Initially we were going to add birch tree wallpaper to one wall as an accent, but seeing as wallpaper can be fairly tedious (and, ahem, I get frustrated easily, ahem), we instead opted for this simple DIY mountain wall mural.

Below is the list of materials we used and complete step-by-step instructions on how you too can create this simple and inexpensive DIY home project. No art skills required.
DIY Mountain Wall Mural
Materials
- Painter’s tape
- Paint in four (4) colours (*colours and amounts used listed below)
- Large roller
- Small roller
- Small sponge brush
- Paint trays
- Damp cloth
Tips for Choosing Paint:
- Main wall: lighter than mountains, but darker than peaks
- Forefront mountains: darkest colour
- Background mountains: lighter than front mountain, but darker than back wall
- Mountain peaks (optional): lightest colour, or even pop of colour for an accent
The amount of paint you need depends on your wall size, but this is what we used for the 10’x10’ room (and similar-sized wall):
- Main wall: 1.5 gallons used on entire room
- Forefront mountains: 1/2 gallon
- Background mountains: sample size
- Mountain peaks: sample size
Note on amount: We really didn’t end up using a lot of paint for this project. Because we were painting our entire condo at the same time, we were able to pull paint from other rooms to use. For example, the colour of the peaks is our master bedroom colour and the background mountains are the same colour as our living room. The only additional paint we had to buy was the forefront mountains (1/2 gallon).
When selecting paint, we opted to use BEHR PREMIUM PLUS® Interior Eggshell Enamel paint, from The Home Depot Canada. This paint plus primer is self-priming over properly prepared uncoated and previously painted Interior surfaces. The soft, subtle sheen of the eggshell enamel resists dirt and grime, so it's perfect for all of your home's busiest rooms, including toddler destruction.
Scroll down to step 6 to see what Behr Premium Plus paint colours we used.

How to Create Your Mountain Mural
Step 1: Paint the room.
First step is to paint the entire room, your colour of choice. We opted for a light grey colour so that the mountains stood out. When it comes time to reveal your mural, this colour will also act as the space between the forefront and background mountains (if you choose to leave a space).
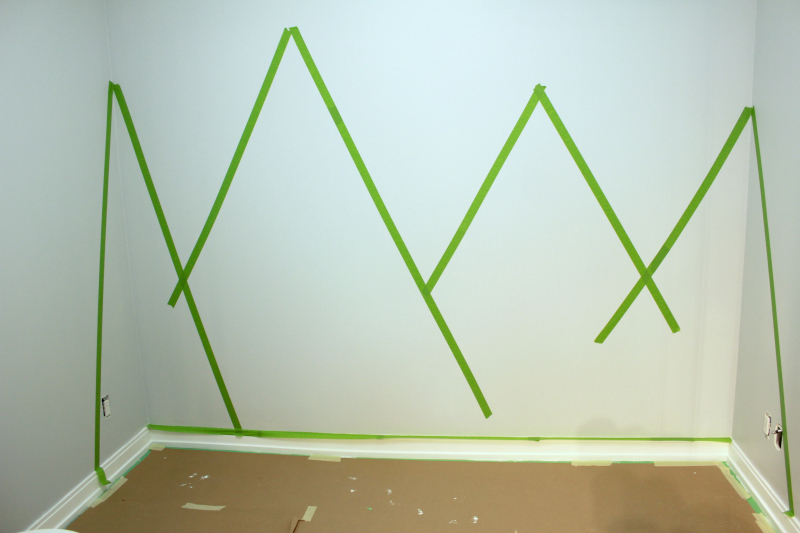
Step 2: Tape out the forefront mountains.
Start by deciding how many mountains you would like, and whether or not they will stay on one wall or onto surrounding walls. We decided on three forefront mountains on the main wall, and then carried them onto the surrounding two walls to give the mural a bit more dimension.
Using the painter’s tape, we created the outline for the forefront mountains. You can always draw out the mountains ahead of time, or just freehand them, which is what we did. It is very important that you are using good quality painter’s tape, such as FrogTape, which will prevent paint bleed and give you cleaner lines. It will also be easier to remove the tape when the time comes. Spend a few extra dollars on the good stuff, it's worth it.
When taping the mountain outline, carry the tape all the way down to the baseboard.
When you have taped out your forefront mountains, take a step back and make sure you like them. This is the time to adjust the tape if needed. For example, at first attempt, our mountains were too symmetrical, so we adjusted the tape to change the height and width of each mountain.

Step 3: Tape out the background mountains.
After creating your forefront mountains, tape out the rear mountains. Be sure to make them different heights and widths, and vary the number between forefront mountains.
Step 4: Tape out the forefront mountain peaks.
Using smaller pieces of tape, tape out the peaks of the forefront mountains. This step is completely optional, but adds some dimension to the mural.
Trim the tape where needed.
Step 5: Go over the tape with a damp cloth.
Using a damp cloth (and I mean damp, NOT sopping wet), go over the tape. This will help give you the most crisp lines and further prevent paint bleed.

Step 6: Paint the mountains.
Using a large roller, we first painted the forefront mountains. The background mountains were painted using a small roller and the peaks using a small sponge brush. We opted to add peaks to the forefront mountains, but left the background mountains as is.
By the time we had painted the background mountains and peaks, we were able to do a second coat on the forefront mountains.
Colours Used
*all Behr Premium Plus Interior
- Main wall: Behr Sterling (780E-3)
- Forefront mountains: Behr Shark Fin (PPU24-19)
- Background mountains: Behr Silver Mine (PPU26-18)
- Mountain peaks: Behr Silver Polish (BL-W13)

Step 7: Remove tape and do touchups.
Allow paint to partially dry, approximately 30-60 minutes. Do not let the paint dry completely, it may cause some of the paint to lift when removing the tape. Carefully remove the tape.
If needed, go back over the edges by hand to clean up the lines.
Optional: Fill in any gaps.
We liked that there was a gap where the tape was, between the forefront and background mountains, so we left as is. However, if you don’t like the gap, you can always go back and fill it in with the background paint colour.

Project Budget
Item
|
Quantity
|
Cost
|
|---|---|---|
FrogTape Multi-Surface Painter's Tape with PaintBlock (1.41" x 60 yards)
|
1
|
$11.47
|
1
|
$39.97
| |
1
|
$19.97
| |
BEHR Premium Plus Interior Eggshell Enamel - sample size
|
2
|
$9.94
|
Performance Select Silver Paint Kit (5-Piece incl. tray, roller, cage)
|
1
|
$11.97
|
1
|
$7.97
| |
1
|
$1.08
| |
TOTAL COST
|
$102.37
|
*based on materials listed above, with paint for entire room
** prices subject to change

The Result
This was such an simple, quick and inexpensive project to tackle, and one that added a pop of character to our little gal’s first big kid bedroom.
We couldn’t be happier with how our mountain mural turned out, and we're happy to see that Morley’s a big fan too. Little gal is sleeping as snug as a bug in the mountains every night.
We couldn’t be happier with how our mountain mural turned out, and we're happy to see that Morley’s a big fan too. Little gal is sleeping as snug as a bug in the mountains every night.
Now if only hanging the decor was as easy as this mural...
Stay tuned for the entire room reveal, coming soon!
Have you tackled a recent DIY home project? I’d love to hear about it!

Disclosure: To & Fro worked with Home Depot Canada to create this special space. Product and/or compensation was received in exchange for this post, however, all opinions are 100% that of To & Fro. This post also contains affiliate links.

Pin This: