Last summer, our daughter’s first birthday party theme was “One in a Melon”. To go with the theme, I decided to create a watermelon shaped piñata. It was really ambitious, I admit. BUT turns out, it was SUPER easy! And not to toot my own horn, but it also turned out pretty amazing and was a smashing success (no pun intended).
Also turns out, I set the birthday bar REAL high, and piñatas are now a birthday party expectation.
So, when Berks’ second birthday came around, I decided to go it again and make an ice cream-shaped piñata, because she was “Two Cool”.

Buying a piñata at a party store can get pricey. Making your own is a cost effective option and not as hard as you’d think. Chances are, you already have all of the materials you need at home. And, it's a good way to repurpose those items destined for the recycling bin - think Amazon boxes, newspapers or flyers and gift tissue paper.
I will admit, while they’re easy, they do take some time to make. At least 2-3 days. So it does take a bit of pre-planning and can’t be a night before decision. But, they’re so worth it because it will be a hit (ok, pun intended on that one).
Check out the easy DIY piñata tutorial, and all of the materials you will need to gather from around your home, below.
Easy DIY Piñata Tutorial
Materials:
- Cardboard (i.e. your Amazon boxes)
- Marker or sharpie
- Scissors
- Tape (thicker tape works best)
- Newspaper or flyers
- Large bowl
- Flour
- Water
- Streamers or tissue paper
- Rope
- Screwdriver
- Sharp knife
- Goodies (i.e. candy - for the inside)
Directions:
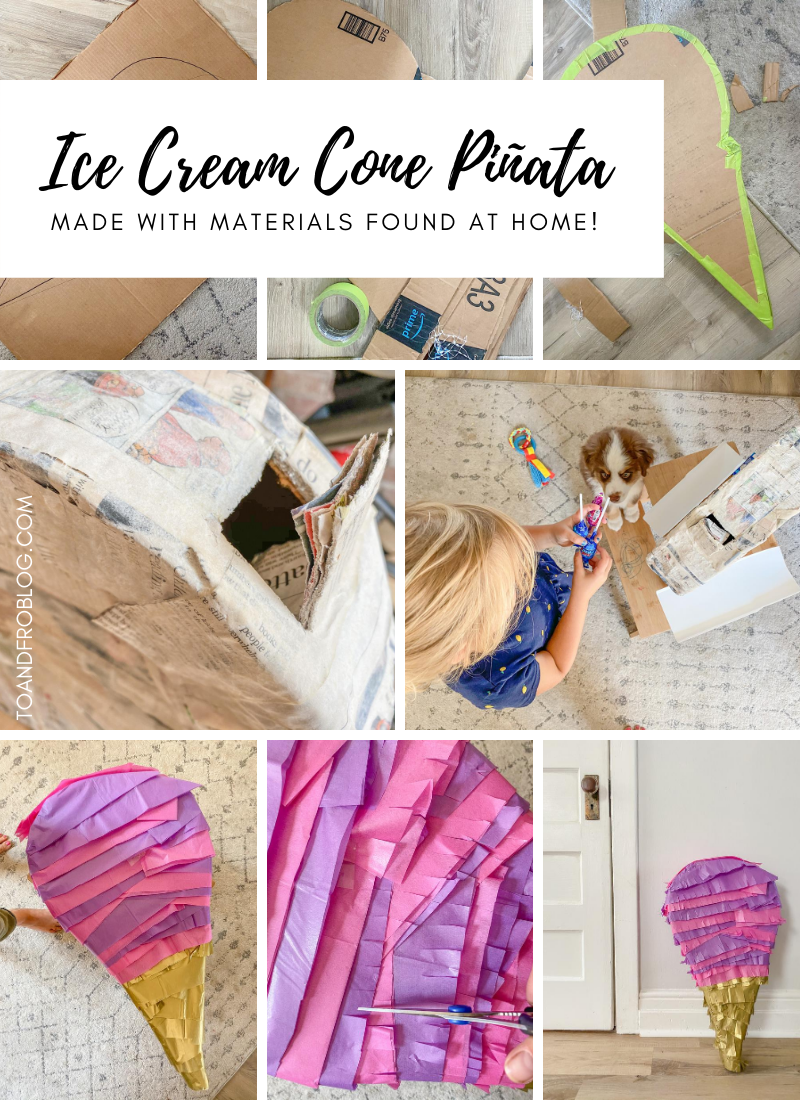
- Repurpose the boxes from all of your COVID Amazon purchases (I can't be the only guilty one?) - Cut two pieces of cardboard, large enough for your design. Using the marker, draw your design and cut it out. Pick a design with less detail. The less detail, the more structurally sound (and easier to put together) it will be.
- Using the left over cardboard, cut cardboard strips, which will act as the edges of the piñata to give it the 3D shape.
- Using the tape, attach the cardboard strips to one side of the piñata face. Repeat for the other side.
- Cut the newspaper into large strips. I kept the newspaper folded when I cut so that the strips were two-ply. It will save some time when getting down to the paper mache part of the piñata.
- Mix up the paper mache goo. You can use traditional plaster of paris, but not everyone has that lying around. Flour and water will work just as well, and chances are, you already have flour in your pantry. Add a little bit of water at a time to get the correct consistency, you want it to be almost pancake batter thin. Add more flour if it is too thin. Flour and water is much more environmentally friendly (and pet safe) as well.
- Start paper maching! Dip the double-layered strips of newspaper into the flour-water mixture. Remove any excess with your fingers. Cover the cardboard cutout with a single layer of paper mached newspaper. Allow to dry for 24 hours, flipping every so often to allow each side to dry. By this point, it should be rock solid. If not, repeat with another layer.
- Before decorating, cut a hole for the candy using a sharp knife. Don’t make it too big, or it will affect the structure of the piñata. It just needs to be as big as the biggest piece of candy or item you will be putting in it.
- Add the goodies to the piñata. Once you are done, close the flap. No need to tape the flap shut, the tissue will eventually cover it.
- Now it’s time to bring the piñata to life and decorate the outside! To do this, you can either use paper streamers or tissue paper cut into strips. When I made the watermelon, I purchased pink paper streamers and green tissue paper at Dollarama. For the ice cream cone, they did not have the colours I wanted in the paper streamers so I bought gold, purple and pink tissue paper (gold for the cone, and purple and pink for the Cotton Candy ice cream, as requested by my four year old).
- Cut the tissue paper into strips. Using tape, wrap the tissue around the piñata and use small pieces of tape to secure it. Remember to start at the bottom and work your way to the top so that the layers overlap properly. Repeat until the entire piñata is covered, with no exposed newspaper or tape. It doesn’t need to be pretty - the next step will help to blend it all together.
- Using scissors, fray each layer of the tissue paper to help to blend it all together.
- Using a screwdriver or sharp knife, poke a hole through both sides of the piñata to be able to hang it. Make sure the hole is about two inches from the edge of the piñata to keep the structure and so it doesn’t fall apart at the rope.
- Once the rope is added, pick a location to hang it, grab a bat or hockey stick and have fun cracking it open!
*See photo below for detailed photo instructions.

Happy piñata-ing!
Have you ever made your own piñata? I’d love to hear about it!