September 1, 2020

Our First Family RV Trip - Road Trip From Toronto to the Bruce Peninsula and Manitoulin Island


With COVID putting a halt to big travel plans this summer, many have turned to staying local. And what is more local than renting an RV and hitting the open road to explore your own backyard? Check out our first family RV trip, where we explored the Northern Bruce Peninsula, Manitoulin Island and Earl Rowe Provincial Park in southern Ontario. 

First Family RV Trip in Southern Ontario


Earlier this summer, we decided to switch things up and rented an RV. While my parents have had a pull trailer for a number of years, and its become the new norm for our family camping adventures, renting an RV (you know, one that you drive) was a first for my husband, two daughters and I. 


We love tent camping. But travelling in an RV opened up a whole new world to us. We were able to go at our own pace, be on our own schedule, while enjoying the comforts of home that you may not experience tent camping.

Read on to learn where our first family RV adventure took us.

Family RV Trip in Southern Ontario - Toronto to Tobermory


We picked up the RV from Canadream, located in Brampton, ON - one of the only major RV rental centres in the Greater Toronto Area. It may be out of the way for most, but luckily it was right by Highway 410, the highway we would take to get us to the northern Bruce Peninsula.


As renting an RV was a new experience to us, we did learn a lot. BUT, I will keep that for another post.


After we were loaded into our RV, we hit the road, or Highway 410, and drove north. Our first destination was my family’s cottage on the Lake Huron side of northern Bruce Peninsula. We didn’t get a chance to visit last summer - I really couldn’t tell you why - so we were long overdue. With social distancing in effect, we had the entire place to ourselves for two nights. 


This place has a special spot in my heart. My mom’s parents built it in the 70s, and I have been visiting since I was 3 weeks old. That’s almost 35 years. So to be able to share it with our girls, who are the 5th generation to visit, is extremely special. Luckily, they love it just as much as I do.


Family RV Trip in Southern Ontario - Toronto to TobermoryFamily RV Trip in Southern Ontario - Toronto to Tobermory

Some rain and grey weather did not stop the girls from swimming in the lake. Either did the record water level - the highest we’ve seen in many, many years. The lake front at the cottage is not sandy, but rocky. So to access it, many many years ago, my Poppa built stairs into the rock. Sadly, the water level has caused a lot of his hard work to wash away. Water shoes and steady feet are now required to navigate the slippery rocks. 


We had the best couple of days, relaxing, swimming and waking up to the sound of the waves on the shore. But, come Tuesday morning, it was time to pack up early and hit Highway 6, driving 20(ish) more minute north to the end of the road at Tobermory.


Usually a trip to the cottage involves an afternoon in Tobermory - lunch at The Fish & Chips Place, ice cream at The Sweet Shop, beers at Tobermory Brewing Company, checking out the boats. If we’re lucky, maybe we even take the glass bottom boat to Flower Pot Island, or dive the wrecks in Fathom Five National Marine Park. But, not this time. This trip, we were boarding the MS Chi-Cheemaun and heading across Georgian Bay to Manitoulin Island. Something I haven’t done in at least two decades, and a first for Steve and the girls. 


Family RV Trip in Southern Ontario - Toronto to Tobermory


The 1.5 hour ferry ride took us from Tobermory to South Baymouth on Manitoulin Island. The weather was perfect, and we enjoyed sitting out on the top deck, taking in the beauty of Lake Huron and Georgian Bay surrounding us on either side.


I should also mention, despite COVID, we felt extremely safe the entire trip to and from on the ferry. Owen Sound Transportation Company (the company that runs the MS Chi-Cheemaun) has numerous protocols in place for the health and safety of their crew and passengers. Prior to lining your vehicle up to board, they screen everyone in the vehicle with the typical COVID screening questions and ask to see masks for every person. Once you board, you are required to where your mask for the entire trip, something that I thought would be a lot more difficult to enforce during the 1.5 hours with a 2 and 4 year old. Social distancing is in effect inside the ship, from limited seating and directional signage to washroom capacity and no access to the gift shop or cafeteria. There are also a lot of staff on hand, continuously sanitizing the cabin. If you’re planning a trip, I recommend you visit their website to see all COVID safety protocols in place.


Family RV Trip in Southern Ontario - Toronto to Tobermory

From South Baymouth we drove to Gore Bay, on the north west part of the island, to grab some beers from Split Rail Brewing Co and have lunch along the beautiful harbour. This place was something out of a postcard, and we easily could have stayed there for longer. But, out next stop called so it was back in the RV. We had every intention to stop for a swim at the very popular Bridal Veil Falls, but when we got there we discovered the stair access was closed for safety reasons AND, even if we chose to walk in, it was a little too busy for our comfort. So, we kept driving to our destination on the island - Batman’s Cottages and Campground, where we would spend the night. 


Family RV Trip in Southern Ontario - Toronto to Tobermory

I’m normally one for lots of trees and privacy when camping, but for one night, this was the perfect spot. We had a site directly across the street from the beach access, which is where we hung out for the rest of the day. The waters of Georgian Bay were cold, as they always are, but that didn’t stop the girls from going in. Before we tucked in for our first night in the RV, we walked around and explored the rest of the campground, checking out the other sites (it’s fun to see other people’s camping setups), the second beach (which is basically non-existent due to high water levels) and fed the ducks. Marshmallows were roasted around the fire, and we called it a night. It had been a long day.

After a successful night in the RV, we had an early start the next morning, heading back to South Baymouth to catch the return ferry to Tobermory.


Family RV Trip in Southern Ontario - Toronto to Tobermory

Knowing we had to return the RV early on Friday morning, we decided to make the most of the last two nights and book a campsite closer to home. Earl Rowe Provincial Park, located in Alliston, ON, fit the bill. From what we could see, it was an hour from the drop off location and had a beach for the girls. 


Well when we we got there, turns out, the beach was closed because of high bacteria levels. (Cue dramatic sigh.) The big fail on our part was that we were really banking on spending the day at the beach, so we didn’t really have any back up plans. Luckily, we were able to fill the time with walks to explore the park (scavenger hunts and ‘I Spy’ have become recent favourites), playing on the slide and swings, ice cream at the park store and inventing our own games that involved pool noodles, buckets and pinecones. 


When it comes to COVID, we felt pretty safe at Earl Rowe. The park was not busy at all, which gave it a peaceful quiet feeling. Something that is definitely welcomed once you’ve been to places like the Pinery and Algonquin at their peak busiest. Showers were closed, but the play structure was open, making sure to go at times when there weren’t any other kids playing. 


*Side note: I have heard from others that Earl Rowe may have been the exception to a quiet Ontario Park, as others such as Pinery, Algonquin, Awenda, Sandbanks and Bon Echo have been just as busy as they normally are during the summer, with very limited social distancing happening. 

Family RV Trip in Southern Ontario - Toronto to Tobermory
Family RV Trip in Southern Ontario - Toronto to TobermoryFamily RV Trip in Southern Ontario - Toronto to Tobermory

After two successful nights camping at Earl Rowe (seriously, RV or not, there’ just something about sleeping in ‘the wilderness’), it was time to head back to Canadream to drop off the RV, pick up our car and head home.

Drop off was very easy, but again, I’ll save those details for another post. 


In all, it was a very successful 5 days exploring southern Ontario in our RV. I could definitely get used to this way of travel. The only question is, where to next?!


Family RV Trip in Southern Ontario - Toronto to Tobermory

There are so many perks to “living the RV life” on vacation. From planning your own schedule, being able to bring the pets, bringing all of the comforts of home and beyond, I can definitely see why people prefer it.

Long story short, it was an amazing trip and we are already planning another one for next summer. This time, it will be a bit longer and a bit further, hopefully exploring a region of Canada we’ve never seen before.


Have you travelled in an RV before? Share your favourite RV destinations. I’d love to hear!


PIN IT

First Family RV Trip - Road Trip From Toronto to Tobermory


SHARE:

August 24, 2020

5 Fun & Easy Summer Cricut Joy Projects (+ Preschooler Flashcard DIY)

*Disclosure: This is a sponsored post written by me on behalf of Cricut. All opinions are 100% mine.

Summer. The days are long, and the kids are out of school. And chances are high that you’ve also been home from work - maybe juggling working and caring for your children? Ya, me too. Keeping them busy and engaged, while limiting screen time to allow you to get work done is not an easy task. And if there is ever a time to pull out the Cricut and create some fun projects with (or without) your kiddos, now is the time.

Today, I’m sharing why I love my Cricut Joy™, specifically five of my favourite Cricut Joy DIY projects that I’ve made at home this summer using Cricut Joy Smart Vinyl™.

5 Fun & Easy Summer Cricut Joy Projects

5 Fun & Easy Summer Cricut Joy Projects

Vegetable Garden Markers

One of my favourite things about our new house is the backyard. It’s crazy what a little green space can do for your mood. Since moving in last summer, I have been so excited for the girls to finally have a place to get outside and play. But, this new green space also meant that I could build an even bigger and better vegetable garden than the container gardens we had on our condo terrace last summer. So we were able to tell what was what, I created these vegetable garden markers using up cycled paint stir sticks that I simply spray painted white and Smart Vinyl - Permanent in black. I measured the size of the paint stir sticks and created the vegetable labels text (DJ Juicy font) in the Cricut design space app. I applied the labels to the painted stir sticks with Transfer Tape, and once completed, added them to my garden next to the appropriate fruit or vegetable. Much better looking that the generic tags that come from the Garden Centre. 

Wooden Welcome Sign

This wooden welcome sign is one of my favourite Cricut Joy projects to date. Earlier this summer, we added a deck to the back of our house, and to give it some added personality, we created this “Welcome to Our Deck” sign. It was also super easy to make, and with several home update projects already on the go, we had all of the materials we needed already at home. I simply created the text in the design space app (Babette font for "Welcome" and Creative Memories Tiny Treasures - Rubber Ducky font for "to our deck"). My design can be found on Design Space here.

5 Fun & Easy Summer Cricut Joy Projects

Mailbox Decal

While our front porch is going to be next summer’s focus, I couldn’t help but take our ugly white mailbox and give it some curb appeal by painting it black to match the porch railings. I then personalized the mailbox with “hello” text created in the Cricut design space app using Babette font (easily my favourite cursive font in the app). Once the mailbox was dry, I applied the cut vinyl in the desired spot using Transfer Tape. 

5 Fun & Easy Summer Cricut Joy Projects

Stemless Wine Glasses

We love to entertain. And while this summer may look a little different when it comes to entertain, I am happy that we have still been able to have those in our bubble over for backyard BBQs. I recently purchased more backyard-friendly plastic stemless wine glasses and decided to jazz them up a little using Smart Vinyl - Permanent in gold. I measured the size of the glasses and created the “cheers” text (Babette font) in the Cricut design space app. I then applied the labels to the outside of the clean glasses uses Transfer Tape. They were very easy to make, and added a little something extra (including lots of compliments and questions about where I bought them) to our backyard get togethers.

5 Fun & Easy Summer Cricut Joy Projects

Preschooler Flash Cards

These flashcards were one of the first projects I made with my Cricut Joy when schools closed back in March. I was determined to keep the learning continuing, and these super simple flashcards were a great help in doing so. Using construction paper and Smart Vinyl - Permanent, in white, I created a set of capital letter cards and small letter cards. These flashcards could be used for letter recognition, spelling names and/or matching capital and small letters. The flashcards were very easy to create in design space, as the font Cricut Alphabet Circle already existed. I simply printed it on the vinyl, and applied it to the construction paper using the Transfer Tape. I did used two separate colours of construction paper, one for the capital letters and one for the small letters. But if you wanted to up the difficulty, you could use the same coloured paper for all. 

5 Fun & Easy Summer Cricut Joy Projects

Next up on my Cricut Joy DIY list? Story blocks. Stay tuned to see how they turn out.

The Cricut Joy makes home DIY projects so easy. Unlike other Cricut machines, the Cricut Joy is a compact cutting machine, less than half the size of Cricut Explore and Cricut Maker—making it perfect for people without a dedicated crafting area (like me)! From customized pillows, to personalized glassware and welcome signs, the possibilities are nearly endless with this fun tool.

For the majority of my projects, including those outdoors, I use Cricut Joy Smart Vinyl - Permanent which is water- and UV-resistant, and lasts up to 3 years. Cricut Joy Smart Vinyl also comes in removal and writable, and a variety of different colours, including mattes, metallics, holographic and more. 

Be sure to check out the Cricut blog, where you’ll will find more DIY inspiration and tutorials! Use the hashtag #CricutAtHome when sharing your project on social media - I would love to see what you create!

Do you have a Cricut machine? What’s your favourite project to make? I’d love to hear - I’m always looking for inspiration!


PIN IT

5 Fun & Easy Summer Cricut Joy Projects

5 Fun & Easy Summer Cricut Joy Projects


SHARE:

August 19, 2020

Easy DIY Piñata - Made with Up-Cycled Materials Found at Home!


Looking to add some excitement to your next backyard birthday party? Check out this easy DIY piñata tutorial, made with up-cycled materials found at home!

Easy DIY Piñata - Made with Up-Cycled Materials Found at Home!

Last summer, our daughter’s first birthday party theme was “One in a Melon”. To go with the theme, I decided to create a watermelon shaped piñata. It was really ambitious, I admit. BUT turns out, it was SUPER easy! And not to toot my own horn, but it also turned out pretty amazing and was a smashing success (no pun intended). 

Also turns out, I set the birthday bar REAL high, and piñatas are now a birthday party expectation. 

So, when Berks’ second birthday came around, I decided to go it again and make an ice cream-shaped piñata, because she was “Two Cool”. 

Easy DIY Piñata - Made with Up-Cycled Materials Found at Home!

Buying a piñata at a party store can get pricey. Making your own is a cost effective option and not as hard as you’d think. Chances are, you already have all of the materials you need at home. And, it's a good way to repurpose those items destined for the recycling bin - think Amazon boxes, newspapers or flyers and gift tissue paper. 

I will admit, while they’re easy, they do take some time to make. At least 2-3 days. So it does take a bit of pre-planning and can’t be a night before decision. But, they’re so worth it because it will be a hit (ok, pun intended on that one). 

Check out the easy DIY piñata tutorial, and all of the materials you will need to gather from around your home, below.

Easy DIY Piñata Tutorial

Materials:

  • Cardboard (i.e. your Amazon boxes)
  • Marker or sharpie
  • Scissors
  • Tape (thicker tape works best)
  • Newspaper or flyers
  • Large bowl
  • Flour
  • Water
  • Streamers or tissue paper
  • Rope
  • Screwdriver 
  • Sharp knife
  • Goodies (i.e. candy - for the inside)

Directions:

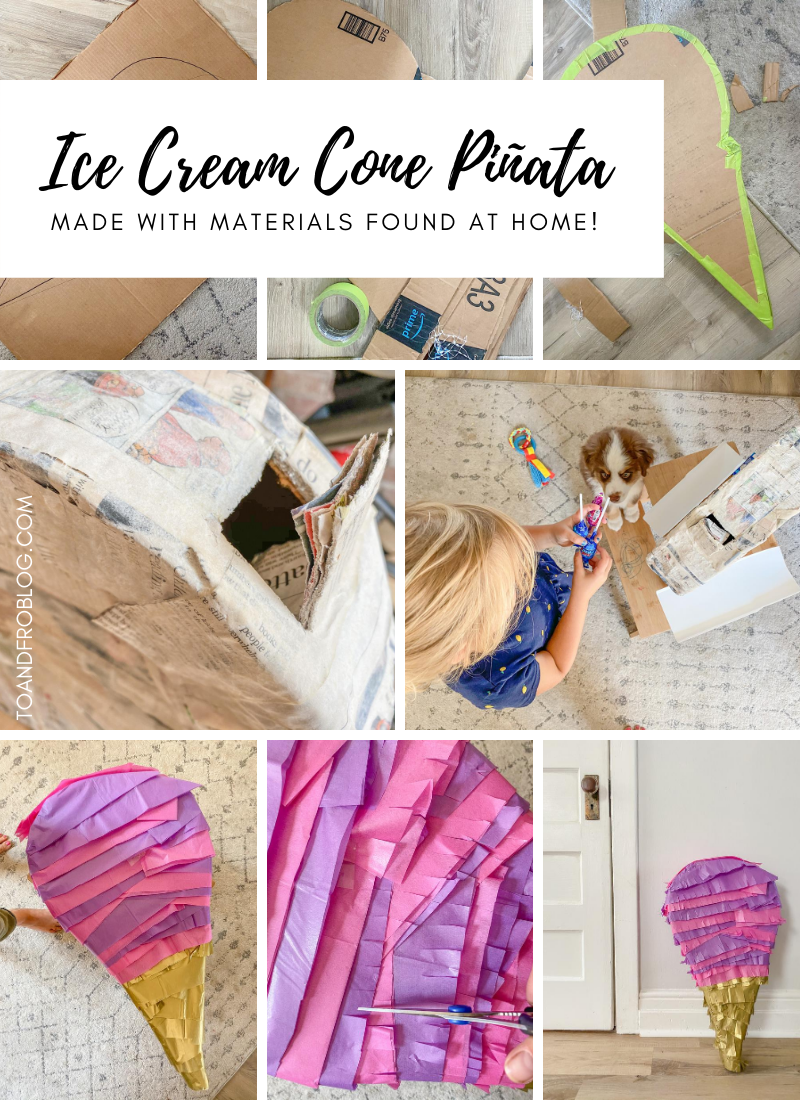
  1. Repurpose the boxes from all of your COVID Amazon purchases (I can't be the only guilty one?) - Cut two pieces of cardboard, large enough for your design. Using the marker, draw your design and cut it out. Pick a design with less detail. The less detail, the more structurally sound (and easier to put together) it will be. 
  2. Using the left over cardboard, cut cardboard strips, which will act as the edges of the piñata to give it the 3D shape. 
  3. Using the tape, attach the cardboard strips to one side of the piñata face. Repeat for the other side.
  4. Cut the newspaper into large strips. I kept the newspaper folded when I cut so that the strips were two-ply. It will save some time when getting down to the paper mache part of the piñata.
  5. Mix up the paper mache goo. You can use traditional plaster of paris, but not everyone has that lying around. Flour and water will work just as well, and chances are, you already have flour in your pantry. Add a little bit of water at a time to get the correct consistency, you want it to be almost pancake batter thin. Add more flour if it is too thin. Flour and water is much more environmentally friendly (and pet safe) as well. 
  6. Start paper maching! Dip the double-layered strips of newspaper into the flour-water mixture. Remove any excess with your fingers. Cover the cardboard cutout with a single layer of paper mached newspaper. Allow to dry for 24 hours, flipping every so often to allow each side to dry. By this point, it should be rock solid. If not, repeat with another layer.
  7. Before decorating, cut a hole for the candy using a sharp knife. Don’t make it too big, or it will affect the structure of the piñata. It just needs to be as big as the biggest piece of candy or item you will be putting in it. 
  8. Add the goodies to the piñata. Once you are done, close the flap. No need to tape the flap shut, the tissue will eventually cover it.
  9. Now it’s time to bring the piñata to life and decorate the outside! To do this, you can either use paper streamers or tissue paper cut into strips. When I made the watermelon, I purchased pink paper streamers and green tissue paper at Dollarama. For the ice cream cone, they did not have the colours I wanted in the paper streamers so I bought gold, purple and pink tissue paper (gold for the cone, and purple and pink for the Cotton Candy ice cream, as requested by my four year old).
  10. Cut the tissue paper into strips. Using tape, wrap the tissue around the piñata and use small pieces of tape to secure it. Remember to start at the bottom and work your way to the top so that the layers overlap properly. Repeat until the entire piñata is covered, with no exposed newspaper or tape. It doesn’t need to be pretty - the next step will help to blend it all together.
  11. Using scissors, fray each layer of the tissue paper to help to blend it all together.
  12. Using a screwdriver or sharp knife, poke a hole through both sides of the piñata to be able to hang it. Make sure the hole is about two inches from the edge of the piñata to keep the structure and so it doesn’t fall apart at the rope.
  13. Once the rope is added, pick a location to hang it, grab a bat or hockey stick and have fun cracking it open!

*See photo below for detailed photo instructions.

Easy DIY Piñata - Made with Up-Cycled Materials Found at Home!

Happy piñata-ing!

Have you ever made your own piñata? I’d love to hear about it!


PIN IT

Easy DIY Piñata - Made with Up-Cycled Materials Found at Home!

SHARE:

July 5, 2019

The Battle of the Bottle: Our Feeding Story


From the day they were born, our girls have been very different. From the colour of their hair, to their demeanour and everything in between, they are almost complete opposites.

how to get baby to take a bottle

This is especially true when it comes to feeding. 

From early on, our oldest was formula fed. And our youngest? At 11 months, is currently still being breast fed. I can count the number of times she's taken a bottle on two hands. The number of times it being formula, even less. The number of times I have been away from her and not nursed her, even less than that. So very different than my oldest. 

But, that all is about to change. As the end of my maternity leave quickly approaches, it’s time to start transitioning her off the boob and onto a bottle. And since I didn’t have to do it with my first, it gives me anxiety just thinking about it. BUT, it must be done. 

Today, I’m sharing our family’s feeding story - or, more appropriately, our “battle of the bottle”.

how to get baby to take a bottle

Before we get started, I think it’s important that I start at the very beginning, and share our breastfeeding journey to date (read more, here). It hasn’t always been smooth.

When we left the hospital with Morley back in 2016, I felt nothing but confidence. At least, as much confidence as a new parent could have. However, shortly after bringing baby home, I started to struggle. Breastfeeding became a struggle, and baby wasn’t gaining enough weight to make our family doctor happy. The next day, we made an appointment with the hospital’s lactation consultation. Minutes after stepping through the door, all of the confidence that I originally had flew out the window. “You’re doing it wrong” and “Try harder” are not words a new parent wants to hear. A new parent wants support, and that’s not what I was getting. I left the hospital feeling absolutely defeated - like something was wrong with me because I couldn’t feed my baby “like nature intended”.

After shedding many tears, I pulled myself together and realized fed was best. 

We turned to formula. She instantly took to the bottle and pretty soon after was at the top of the charts for a baby her age. This route also allowed dad to take some of the midnight feeding shifts and allow me to rest. Amen to sleep. 

And then, two and a half years later, little sister Berkley was born.

how to get baby to take a bottle

Like Morley, I thought her taking a bottle would be a walk in the park. How different could they be?

The answer? Different. Very different. Unlike her big sister, Berkley did not instantly take to the bottle. 

Unlike her big sister, Berkley was born on a weekday when the hospital offered a morning breastfeeding class. Having nothing but time while waiting to be discharged from the hospital, we went to the class. Why not, we thought. All I can say is that if that kind of support had been available when Morley was born, there’s a strong chance that I wouldn’t have felt the way I did.

Berkley instantly took to the boob.

how to get baby to take a bottle

Now that Berkley is almost 11 months old, and I’m starting to think about going back to  work and sending her to daycare, it’s time to start transitioning her off the boob and onto the bottle.

For 10 plus months, she has been used to the comfort of being breast fed, something taking a bottle lacks for her. I knew the transition would not be a walk in the park. 

So, how are we making out? Well, let me just say, we’ve still got some work to do before the end of August rolls around…

BUT, we have made progress. 

One thing that’s helped are the Philips Avent products we use. During her meals, she typically drinks water from a Philips Avent Spout Cup. Since we would be giving her a Philips Avent Natural bottle at night, one thing I did was switch out the spout cup nipple with the natural bottle nipple so that she would get used to it. These BPA-free bottles have an ergonomic shape for maximum comfort, making them easy to hold and grip in any direction. The ultra soft nipple more closely resembles the breast, making an easier transition from breast to bottle. Luckily, she had no problem drinking her water from the sippy cup with a bottle nipple. I thought it would be smooth sailing from there.

But then I remembered, there was the issue of my supply. Having introduced food months before, my milk supply has decreased and I stopped pumping months before. The freezer stash had been depleted. So, we turned to formula. But, she refused to drink it. So, with guidance from our family doctor, we introduced whole milk at 10 months. Now, that’s a different story. 

how to get baby to take a bottle

She isn’t 100% hooked on drinking whole milk from a bottle, but like I said, it is still a work in progress. The clock is a ticking though, and if I’ve learned anything from baby number 2 it’s that time flies and the end of August will be here before we know it. That battle of the bottle has got to end at some point.

So moral of this story? ALL kids are different - in shape, in size, in demeanour and even, in the way they feed.

My advice to new mamas? YOU do YOU. Do what feels best for you, best for your babe and best for your family. 

But it’s also good to have some trusted tools, like Philips Avent, in your back pocket. 

What are your tips for getting baby on the bottle? I’d love to hear!

You can find more about our parenting adventures AND our favourite Philips Avent products, here:


*Disclaimer: This post is in partnership with Philips Avent. I received products and/or compensation in exchange for this post. All opinions and advice shares are 100% that of To & Fro.


PIN IT:


SHARE:

April 16, 2019

Baby Feeding Favourites: 8 Months


It’s been approximately three months since we started little sister on solid food, and two months since I shared my baby feeding favourites for six month olds.

Man, oh man, time sure flies.

baby in Peg Perego Prima Pappa Zero 3 highchair

Now that the little one is eight months old, her feeding habits have definitely changed.

We’ve gone from strictly breast milk to adding cereal and purees to now teaching her to self-feed with baby-led weaning.

I will admit, baby-led weaning can be scary for parents - not knowing how baby will react to feeding themselves, if they’ll know to chew or not put so much in their mouths, etc. But, nervousness aside, it is also a great opportunity to develop their hand-eye coordination, independence and confidence while eating. While the mess they make may not be fun to clean up, it is fun to watch them discover this new “skill” of feeding themselves. 

Before I share our baby feeding favourites for eight months, make sure to check out my breastfeeding journey (and how we taught our toddler what it means) hereI know I’m not alone in the struggle, and am thrilled that my second time around, I have been able to breastfeed this long. But, I am also glad food has now been introduced, because mama (and her boobs) need a break!

Baby Feeding Favourites: 8 Months

Ok, and now to the point of this post…

When it comes to feeding the babe, the products you use are definitely important to making it a comfortable and positive experience for both the feeder and the eater. 

I am not an expert. Every baby is different. What we do and the products we love may not work for others. Because of that, this post does not contain advice on how to start eating solids. Instead, this post contains the current products we use and love for feeding our eight month old.

Baby Feeding Favourites: 8 Months

While this drying rack has an almost permanent place on our kitchen counter, when not in use, it folds for easy storage. It is also easy to clean. Since the babe doesn’t really use a pacifier anymore or take bottles (it’s a real struggle), we mostly use this for drying sippy cups, toys, etc.

This handy dishwasher caddy fits pacifiers, spoons,nipples and bottle tops, sippy cup lids, etc. so that they don’t get lost in the dishwasher. It comes in blue, pink and green. Like the drying rack, we mostly use it for zippy cups, spoons, toys, etc.

This highchair offers offers convenience and functionality in the form of an ultra-compact high chair. It fits perfectly in our small space because when not in use, it  folds compactly and with little effort. It can be used from birth because of its full recline and the 7 height positions enable the high chair to grow with child. The removable tray cover is also dishwasher-safe, which is key for the self-feeding babe.

This all-in-one placemat and plate suctions to the table, and is perfect for the self-feeder (age 6+ months). It is made from 100% food-grade silicone that is BPA, BPS, PVC, latex and phthalate-free. One of the things I love about it is that portion sizes (i.e., the eyes and smile) are catered to infants at 2oz, 2oz and 4oz. It also comes in a variety of colours, and fits most high chair trays. We use the mat at home (to try and keep things a bit tidier) but we have also used it at restaurants and at a resort on vacationto help keep food off the table.

The babe is not a fan of bottles, so when she started drinking water, we moved right to this spout cup (for babies 6+ months). This BPA-free spill-proof 7 oz. sippy cup comes with soft touch handles that make it easy for your little one to comfortably take their first sips without the mess. The handles are also good to chew on for that teething babe.

Whether your babe is eating purees or finger foods, these bibs are handy to have around. They will keep clothes clean, have a handy pocket to catch the castaways, are easy to clean and can be rolled up to be packed away in the diaper bag.

These infant spoons contain the patented White Hot System - the spoon tip turns white when baby’s food is too hot so you know exactly when to feed and when to wait and let it cool. The tapered spoon bowl is comfortable for little mouths, and the soft tips are gentle on gums. These spoons are BPA-and phthalate-free and top rack dishwasher-safe.

The lid allows us to pack food in the diaper bag without having to worry about spills.

9. Baby Mum Mum Rice Rusks 
These “cookies” are not only a snack for the babe, but also help with their hand-eye coordination.

10. Gerber Puffs
An alternative to the rick rusk cookies, these puffs are good to help develop hand-eye coordination, and some in a variety of different flavours. 

And since babes learning to self-feed aren't the tidiest eaters, you may also want to invest in this upholstery cleaning tool that we swear by to clean up after both the babe AND toddler.


baby in Peg Perego highchair

What Is She Eating and How Much?

I have had a lot of people ask what she is currently eating at 8 months old. Let's just say, she has a pretty hearty appetite and palette to go with it.

Here is what she is currently eating:
- Avocado
- Banana
- Blueberries
- Broccoli
- Carrot
- Cauliflower
- Chicken
- Corn
- Cous cous
- Egg (scrambled or hardboiled)
- Mango
- Oats
- Pear
- Peas
- Quinoa
- Rice noodles
- Salmon
- Star pasta
- Strawberries
- Sweet potato

When we are at home, I have moved away from purees. Usually I will save those if we go out for dinner, to make less of a mess. When I cook the food for her, I will usually make enough to last a few days, and store it in small containers in the fridge. I don't have a set menu for her, I kind of just pick and choose at meal time, making sure to switch it up each time. She is eating three times a day - around 8am, 12pm and 6pm, with breastfeeding sessions before nap and bedtime and puffs/rice crackers as snack in between.

*Always remember, to check with your family physician/paediatrician before you start feeding your baby solids.

Am I missing anything? What are your favourite baby feeding essentials? I’d love to hear!

And as always, if you have any questions about what she is currently eating, etc., please reach out!


Disclosure: This post may contain affiliate links. View To & Fro’s full disclosure policy, here.
SHARE:
Blog Design Created by pipdig