December 28, 2019

The Best Chicken Dumpling Soup Recipe


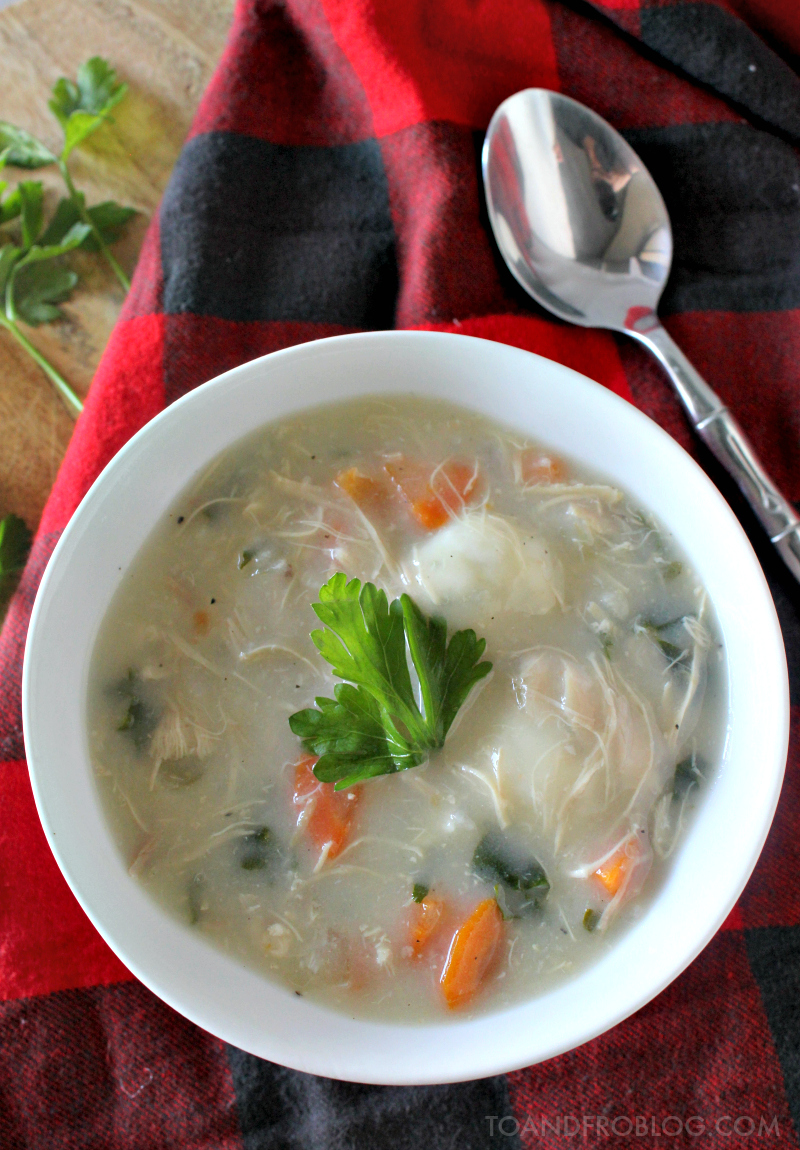
Looking for the perfect comfort food in a bowl? Check out this hearty recipe for the best Chicken Dumpling Soup, loaded with chicken, vegetables and tasty dumplings. 

The Best Chicken Dumpling Soup Recipe

I recently discovered cooking chicken in the slow cooker. I don't know why I wasn't cooking it this way before - boy, was I really missing out. And it's so easy! Just add twskin-on, bone-in chicken pieces (usually breast and thigh combos) to the slow cooker, season with a bit of salt and pepper and then cover with approximately 2 cups of water. I then allow it to cook on high for 3-4 hours, or until no longer pink, and voila! Delicious, juicy, tender, fall-off-the-bone chicken. 

Not only does it create tender, delicious chicken, you will also be left with a flavourful broth that can be used in your next recipe, or in this delicious soup recipe.


During the cold months, soups are my go to. I usually pay them with a side salad or a sandwich. This soup, however, is a complete meal in a bowl. Loaded with that tender chicken, hearty vegetables and tasty dumplings, this Chicken Dumpling Soup is sure to win over your family's stomachs this chilly winter.

Chicken Dumpling Soup

Ingredients

Soup:
  • 1 tbsp extra virgin olive oil
  • 1 cup celery, chopped
  • 1 cup carrots, peeled and chopped
  • 1 small onion, diced
  • 3 cups chicken, cooked and chopped
  • 3 cloves garlic, minced
  • 1/2 tsp garlic powder
  • 4 cups low-sodium chicken broth
  • 4 cups water
  • 1/2 cup all purpose flour
Dumplings:
  • 2 cups all purpose flour
  • 1 tbsp baking powder
  • 1/2 tsp baking soda
  • 1/4 tsp salt
  • 1/4 tsp pepper
  • 6 tbsp unsalted butter, melted (3/4 stick)
  • 3/4 cup buttermilk (or 1 tbsp white vinegar and 3/4 cup milk, combined)
  • 2 tbsp fresh parsley, minced

Directions

  1. Add the olive oil to a large stock pot and bring to a medium-high heat. Add celery, carrots, onion and garlic and sauté for 5-7 minutes, until onions are translucent.
  2. Add chicken pieces and garlic powder to the pot. Stir to combine.
  3. Add chicken stock and water to the pot. If you like your soup salty, feel free to use 8 cups of stock, instead of half water, half stock.
  4. Bring mixture to a simmer for 25-30 minutes.
  5. While soup is simmering, make your dumplings. In a medium bowl, whisk together dry ingredients. Stir in the melted butter, buttermilk and parsley until just combined. At this point, should be a nice dough. Set aside.
  6. Ladle 2 cups of the cooking liquid into a large bowl. Whisk in 1/2 cup of flour until smooth. Add flour mixture back into the soup by continuously whisking until combined. Simmer until slightly thickened, occasionally whisking, about 8-10 minutes.
  7. Once soup has thickened, add dumplings. Form balls of dough about the size of half of your thumb. Gently drop dumplings one at a time into simmering soup. Simmer, covered, until dumplings are firm, about 12-15 minutes.
  8. Season with salt and pepper.
  9. Serve immediately, sprinkled with additional minced fresh parsley for garnish (optional).
Home Chef Tip 1: If you do not end up using all of the dumpling dough (I only used about half), store the remainder in the freezer in a freezer-safe container. It will keep for a few weeks.

Home Chef Tip 2: If you do not want to cook the chicken from scratch, you can also use leftover chicken or turkey and premixed stock.

Voila, comfort food at its finest!


If you like this recipe, you may also like this recipe for Fall Harvest Root Vegetable Soup.

What is your favourite soup recipe? Any fall or winter favourites? I'd love to hear!


SHARE:

December 19, 2019

100 Night Endy Mattress Review, From an Honest Preschooler


The holidays are just around the corner, which for many families (including ours), means go go go. At the end of the day, all you want to do is rest your head on something comfy and enjoy a long winter’s nap. Am I right?

It’s been 100 nights since Morley got her very own, Canadian-made Endy mattress. And as promised on Instagram back in September, here is HER 100 night Endy mattress review.

100 Night Endy Mattress Review, From an Honest Preschooler

When we moved into our new house at the end of August, the transition was a bit tough on the girls. New surroundings for a toddler and preschooler take a bit of time getting used to. 

Our oldest, Morley, had a hard time settling into her new room. She would always end up in our bed because, according to her, our bed was comfier.

We knew we needed our bed back. And we knew just the way to do that - to get her her own Canadian-made Endy mattress, so she didn’t have any excuses to stay in her own bed.

100 Night Endy Mattress Review, From an Honest Preschooler

It’s been 100 nights since her new mattress arrived, and well she hasn’t had a perfect track record of staying in her own bed, we’re working on it.

And because it’s HER mattress, I thought she would be the best to give a 100 night review. Because while she may not be the best sleeper, she’s pretty damn honest.

100 Night Endy Mattress Review, From an Honest Preschooler

Mom: What do you think of your new room?
Morley: I like it.

Mom: What about that big, special delivery did you get a few months ago?
Morley: [Thinks about it for a minute…] A new mattress?

Mom: Why did you get a new mattress?
Morley: Mine wasn’t comfy.

Mom: Is this one comfier?
Morley: Yep.

Mom: So comfy that you’ll stay in your own bed from now on?
Morley: No, cuz some nights I’m scared.

 Mom: Why are you scared?
Morley: Because I think there’s a monster.

Mom: Where does the monster come from?
Morley: I don't know...??? 

Moving on...

Mom: Do you think your sister likes your new mattress?
Morley: Ya, she always climbs up on it.

Mom: Do you think she’d like a new mattress one day?
Morley: Ya, I can share it with her one day!

Mom: So, I’m guessing you’re happy with your new mattress?
Morley: [the sister love continues…] Ya, I can cuddle with her. And we can share stuffies.

Mom: That’s such a great idea!

Mom: Do you wake up feeling refreshed?
Morley: Ummm…. ya.

Mom: Are you going to sleep in your own bed tonight?
Morley: [long dramatic pause] Ummm…. No.

Mom: Well, at least you’re honest.

100 Night Endy Mattress Review, From an Honest Preschooler

And if that honest testimonial doesn’t make you want to get one for yourself, maybe my thoughts will…

The Pros:

  • Endy products are made right here in Canada. That, I can support.
  • Your order is delivered right to your door, absolutely FREE. (If you don’t own a car, this is key!)
  • The mattress comes tightly packaged in a box, saving space in your home while you wait to set it up (or remove your old mattress).
  • As an added bonus, the Endy box makes the perfect toddler and preschooler “play house”.
  • The set up itself is impressively easy. You take the mattress out the box, lay it on your box spring or bed base, remove the plastic covering and voila - within minutes your mattress is ready to be tested!
  • The Endy Pillows are incredible, and depending on what type of sleeper you are, you can even customize them by removing or adding some of the foam. They are also hypoallergenic and come with a 60-night risk-free trial and a 3 year manufacturer warranty in case something goes wrong.
  • The Endy Pillows are also super easy to wash (speaking from experience, and a recent round of the stomach flu that hit our house. Sorry, TMI.)
  • The Endy Sheets are 480 thread count, 100% sateen weave cotton and feel like hotel sheets. They also come with a 60-night risk-free trial and are also protected by a 1-year warranty against manufacturing defects.
  • The mattress has very little motion transfer. (I’m sure my husband appreciates this when I get up to comfort a sad kiddo in the middle or the night.)
  • Their return policy is pretty key. If you don’t like it, you can return it within 100 nights. No questions asked. (I honestly don’t know who would though.) Also to note, Endy works with 124 local charity partners across the country to pick up and donate your mattress if it doesn’t make it past the 100 Night Trial.

The (Not So Conny) Cons:

  • While the Endy Mattress is packaged in a box for easy transport, the box is pretty heavy. You may need assistance to move it to its final resting spot.
  • When we first opened the mattress, it did have a bit of a chemically smell, but that dissipated fairly quickly.
  • It does take a few nights getting used to. Definitely not a bad thing considering what we were feeling was the support our old mattress lacked.
  • Starting at $675 for a Twin, it is a bit on the pricier side if you’re on a budget. BUT then again, what is a better night’s sleep and your overall health worth to you?
  • Our biggest dislike is that we didn’t get one for little sister. Despite still sleeping in a crib, she seems to enjoy it just as much as the rest of us! I can see many nights her trying to sneak in with big sissy.

Conclusion:

I know what you’re probably thinking - “They got it for free. If they had to spend the money on an Endy, would they?”. Yes! Yes! Yes! Yes, we did get this sleep set in exchange for an honest review, BUT if we had to do it all over again, we absolutely would still choose Endy. And once our youngest is out of her crib and into a “big girl bed”, we probably will buy one! In our honest opinion, it is worth every single penny. Your sleep and well being is worth every single penny.

100 Night Endy Mattress Review, From an Honest Preschooler

The Endy Mattress is incredibly comfortable, providing support in all the right places. I wake up feeling refreshed - no kinks in my neck, no sore back, nothing but refreshed. Well, refreshed as a mom of a near 4 year old and 16 month old can feel…

Stay tuned for Endy’s BIG Boxing Day deals! To learn more about this Canadian-made mattress, visit endy.ca.

Do you have an Endy mattress? I’d love to hear your thoughts! Thinking about buying one, but have questions first? Ask away!


*Disclosure:  I received this ENDY sleep set in exchange for my honest review. All opinions are 100% that of To & Fro.

PIN IT:

100 Night Endy Mattress Review, From an Honest Preschooler


SHARE:

December 17, 2019

Holiday Giving: Five Organizations That Support Young Families in the Greater Toronto Area


As the holidays approach, we naturally shift our attention to finding the perfect gifts for our families and friends. But, they aren’t the only ones who need our care this time of year.

In the Greater Toronto Area, there are many organizations accepting donations for those in need during the holiday season, and beyond. Read on to discover five local organizations that support a demographic near and dear to my heart - moms and young children!

Five Organizations That Support Young Families in the Greater Toronto Area

Last year, we adopted a “24 Days of Kindness” challenge with our preschooler - a way to teach her how to be kind (not just around the holidays), and the importance of giving back.

One of her challenges was to select a charity to donate to. As an animal lover, she naturally chose the local animal shelter, where we donated a bag of dog and cat food to animals in need.

This year, we’ve opted to give to a cause close to our hearts - new moms and young children in need.

Five Organizations That Support Young Families in the Greater Toronto Area

Even in the best circumstances, parenting can be quite the challenge. But for some, even affording the basic necessities is a struggle. It’s no secret that babies need a ton of stuff, but all of that stuff comes at a hefty cost. That’s why so many shelters and charities that serve women accept donations of baby gear, maternity gear and beyond. 

In the Greater Toronto Area, there are so many fabulous organizations accepting donations this holiday season (and beyond) - in the form of money, time or gifts.

Five Organizations That Support Young Families in the Greater Toronto Area

So what will we be donating this year? When donating to organizations, we choose brands that our family knows and loves, and uses every day! Philips Avent is one of those brands.

From the very beginning, we have been a Philips Avent family. Some of our favourites? 

Philips Avent Natural Bottles - These BPA-free bottles have an ergonomic shape for maximum comfort, making them easy to hold and grip in any direction. The ultra soft nipple more closely resembles the breast, making an easier transition from breast to bottle.

Philips Avent Anti-Colic Bottles with Airfree Vent - These bottles are designed to reduce colic, gas and reflux. The shape of the nipple allows a secure latch and stays full even when the bottle is horizontal, allowing baby to drink in an upright position so that they swallow less air as they drink.

Philips Avent Soothie Snuggle - The same great Soothie that many families and medical professionals know and trust, but with a soft, lightweight snuggly toy to help make babies feel secure.

Five Organizations That Support Young Families in the Greater Toronto Area

If you have gently used baby gear that you’d like to donate, or if you’d like to give the gift of brand-new items, money or even time, here are five fabulous organizations in the Greater Toronto Area that are in need.

The New Mom Project

The New Mom Project was started to provide marginalized families with basic baby necessities to get them off to a great and loving start. Since 2014 they have helped over 1000 families!

What they accept: Donations of gently used or new items and distribute them to families in need. 

The Birthday Candle Project

The Birthday Candle Project believes that every child deserves to be celebrated. Their mission is to bring joyful birthday celebrations to children living in women’s shelters in Toronto. They partner with organizations and individual families to collect unused (or gently used) party supplies, and then through a little creativity and magic, build parties for children who deserve to be celebrated!

What they accept: New or gently-used party supplies, birthday gifts and gift cards. They also have an option of building a Pack-a-Party. 

Toronto Diaper Bank 

The Diaper Bank of Toronto helps fill a critical and otherwise unmet need for diapers among the most vulnerable in our community. They believe that clean diapers are a basic need for babies and their caregivers, yet 1 in 4 children in Toronto live in poverty and these families are at risk or have experienced diaper need.

What they accept: The Diaper Bank accepts financial support, but also loose, opened and new packages of diapers. They will also accept wipes and formula. 

Jessie’s Centre

This organization helps young mothers with kids and those expecting by providing them with resources. Their mission is to nurture the healthy development of pregnant teenagers, young parents and their children.

What they accept: The centre is always on the lookout for baby clothes, clothes for young women, and maternity wear.

Boys & Girls Club of East Scarborough

The Boys & Girls Club of East Scarborough provides services to 5,000 low-income children and youth from the surrounding area. Services include licensed childcare, early-years programs, before- and after-school programs, sports and recreation clubs, and leadership development. 

What they accept: This holiday season they are looking for donations for The Holiday Box (a program that gives families small items they need for day-to-day life), Sponsor a Child (a program where you purchase gifts, clothing and groceries for a child) and their Toy Drive (where you can drop off an unwrapped toy that will be gifted to a child).

Five Organizations That Support Young Families in the Greater Toronto Area

This holiday season, celebrate motherhood by giving a little bit of yourself to the mothers who don’t know you but need your help!

How do you give back? Do you have a charity that you donate to around the holiday season, or beyond? I’d love to hear!


*Disclaimer: This post is in partnership with Philips Avent. I received products and/or compensation in exchange for this post. All opinions and advice shares are 100% that of To & Fro.

PIN IT:

Five Organizations That Support Young Families in the Greater Toronto Area


SHARE:

December 14, 2019

Last Minute Gift Ideas for Toddlers and Preschoolers


Christmas is just "12 sleeps" away! You better believe my toddler and preschooler have made their lists, and have checked them (more than) twice...

If you're looking for some Last Minute Christmas Gift Ideas for Your Toddler and Preschooler, look no further! Keep scrolling to see the round up some of our favourite gift ideas for the littlest ones in your life.
Last Minute Gift Ideas for Toddlers and Preschoolers

Last Minute Gift Ideas for Toddlers and Preschoolers


For the Toddler


To see more of our list for toddlers, hop on over to To & Fro's Amazon page, found HERE

Last Minute Gift Ideas for Toddlers

Books

Books are a BIG hit in our house with our 16 month old. She especially like books with flaps and movable parts, like "I Thought I Saw a Bear". This series also has an elephant, dinosaur and monkey.

Eating

Some of our favourite products for toddler and preschooler feeding come from Munchkin Canada. Specifically these Silicone Mats (also good for playdoh, other messy activities and airplane travel) and the Colour Me Hungry eating set, which comes with a plate, bowl, cup, utensils AND a box that they can colour. 

Fun & Games

This list could go on and on, but I've just narrowed it down to a few favourite toys. We like toys they are fun, but that also encourage problem solving, using imagination and independence, to name a few.

Some of our favourite includes - Duplo blocks, these magnetic building tiles, play-doh (don't forget to use the Munchkin Silicone Mats with this), Mr Potato Head, anything from Leapfrog (including this Step and Learn Scout), Melissa & Doug puzzles and these no-mess colouring pads

Bath 

Again, Munchkin has some great bath time fun for little ones, including these bath numbers and letters that stick to the side when they are wet. 

Check out the rest of our list, HERE

For the Preschooler


To see more of our list for preschoolers, hop on over to To & Fro's Amazon page, found HERE.

Last Minute Gift Ideas for Preschoolers

Books

Right now, we're all about talking about emotions with our preschooler and find that books really help - In My Heart and The Color Monster are two great examples.

Some of our other favourites include The Wonky Donkey, The Big Bed, Disney Collection of Stories, E.T. the Extra-Terrestrial and anything Fancy Nancy.

Fun & Games

Play-doh is a great gift idea because it's not age specific and can be used by both toddlers and preschoolers (and maybe even mom and dad).

At the age of four, Morley is also starting to get into games including Classic Jenga (she's quite the pro), Guess Who and Connect Four, to name a few.

Arts & Crafts

Our preschool is just starting to get into arts and crafts where you must follow instructions, including this friendship bracelet making kit. They're still a little difficult for her to do on her own, but with a little bit of help she's able to design her own fancy jewellery.

Dolls

If you're like us, Frozen fever is running through the house. It's Frozen all day, every day. Our preschooler also LOVE playing with dolls, so we combine the best of both with these Anna and Elsa dolls. And don't forget the dress up gear to turn your preschooler into Anna or Elsa themselves!

Barbie has so many options and play sets. We love the dream house because it creates hours of endless fun, and encourages our preschooler to make believe. In honour of Barbie's 60th, Mattel released a line of career dolls, including the Barbie firefighter.

Check out the rest of our list, HERE


*It is important to note, this is a list of the things our girls (age 16 months and almost 4 years) love and play with on a regular basis. Please ensure they are age appropriate before purchasing. 

What's on your kids' Christmas lists this year? I'd love to hear!


Disclosure: This post contains affiliate links.

SHARE:

October 18, 2019

Bring Nature Indoors with this Do It Yourself Mid Century Modern Plant Stand


If you're looking for a stylish yet minimalist plant stand, this inexpensive do it yourself mid century modern-inspired plant stand is a simple solution for your indoor plant needs. 

Mid Century Modern Plant Stand DIY

While living in a big city has some challenges to getting outside into nature, one way we cope is by bringing nature to us, and filling our house with greenery. Not only do plants held purify the air, but they also help to reduce stress (yet another “side effect” of living in a big, busy city). I haven’t yet achieved “crazy plant lady” status, but I’m well on my way.

Since we moved into our new house, I’ve been on a little bit of a plant buying kick. And with all of the new plant babies, I was needing some planters that would be worthy AND kick my plant cred up a bit.

I’ve seen these mid century modern-type plant stands being sold at fancy retailers for in the hundreds of dollars. I’ve always loved the look of them, but not the pricey tag associated. I knew it was something I could easily make myself, for a fraction of the cost. So, a DIY it was. 

Mid Century Modern Plant Stand DIY

Here’s how to make your own Mid Century Modern Plant Stand (with a custom plant pot)

What You’ll Need


For the pot:
plant 
pot
white spray paint
accent paint (optional)
brush
painter’s tape
gravel (if pot lacks drainage)

For the plant stand:
1 - 1’’ x 2’’ x 8ft select pine board
1 - 1’’ x 2’’ x 6ft select pine board
4 - 3/8’’ wood dowels 
1/2’’ wood chisel
drill
saw
wood glue
sand paper
rag
wood stain
clamps

What You’ll Need to Do

First step is to pick your plant, and the pot it will go in. This will determine the size of your stand. 

For the plant, I opted for a Dracaena marginata, better known as a Dragon tree. This plant is an attractive, stiff-leaved plant with green sword-like leaves edged with red. They are perfect for a beginner crazy plant lady (like myself) because they're very easy to grow indoors.

I bought my pot at a local thrift store, for $4.99. I liked it’s unique shape. Try to find a pot that does not have drainage holes in the bottom. If it does, you will have to add a tray underneath (which may not fit in the plant stand) or risk water on the floor. Of course you could opt for a store bought, plain old Jane pot, but what’s the fun in that?! 

*Skip ahead to the plant stand portion if you are not customizing your pot.

Now it’s time to create your custom pot. Spray paint your pot white (or colour of your choice). I used Rust-Oleum Painter’s Touch 2x Ultra Cover Paint + Primer (spray paint) in flat white. It is fast drying, and even bonds to plastic if that’s the type of pot you’ve chosen. 

Mid Century Modern Plant Stand DIY

Since you won’t be completely filling the pot with dirt, make sure you spray inside of the pot, approximately 1-2’’ down from the top. A note about spray painting the pot – don’t hold the can too close to the pot or the paint will run! If it runs, quickly wipe the drips with a rag.

Once the pot is dry, use painter’s tape to create your design. My pot has a very prominent top, so I opted for a simple stripe design.

Add your accent colour. I used Behr’s 2020 Colour of the Year “Back to Nature” (S340-4) to add a little pop of colour. I was instantly drawn to the name, and knew it would help to add some warmth and comfort to our house in the times that we cannot actually get back to nature.

Mid Century Modern Plant Stand DIY

Once the pot is dry, remove the tape to reveal your design. (The shape of the pot made it a bit difficult to apply the tape in a straight line, so the green paint did slightly bleed and the line was not crisp. I did have to touch it up with some white spray paint.)

Pot the plant. If you pot does not have drainage holes, add some loose gravel to the bottom to collect any standing water.

Now for the main piece, the mid-century modern plant stand itself. For help with this, I brought in some reinforcements (also known as, my husband). 

Measure out how high you want your plant stand. We opted for window level (approximately 24’’). Using a saw, cut this measurement (x4) from the 1’’x 2’’x 8ft. Since the legs were to be 24’’ each, we used the entire piece of wood for the legs. For ease, we just cut it evenly in 4 pieces.

Mid Century Modern Plant Stand DIY

To make the piece that the pot will sit on, measure the diameter of your pot and add one inch. If your pot does not have straight sides, measure the widest part of the pot. This is the length you will be cutting your 1’’x 2’’x 6ft board into. You need two of these pieces cut. For reference, our pieces were 11’’ wide each. 

Using a ruler, measure to the middle of the boards and draw out a 3/4″ square on each board (see photo below for reference). Use the wood chisel to carefully remove this piece. 

Mid Century Modern Plant Stand DIY

Lay the two pieces into one another. They should fit snugly without too much play and the top should be level. If your cut was not 100% accurate, you may need to sand a little to get them to line up evenly. Do not attach them two pieces just yet. 

Now to attach the cross piece to the legs. Measure the height of your pot and remove 1-2’’. You want the top of the pot to be higher than the legs of the stand. Mark where the cross pieces will rest on the legs.

Mid Century Modern Plant Stand DIY

Using a drill, make a hole in the end of the cross pieces. Insert the 3/8’’ dowel. Add wood glue if needed. Depending on where you would like the pot to sit, drill holes in each of the four legs. For reference, the cross piece of our stand sits 6’’ down. 

Attach the legs to each of the cross pieces by inserting the dowels and adding wood glue to ensure they stay attached. Fasten a clamp and allow to sit until glue is dry.

Once the glue is dry, remove the clamps. Using a rag, generously rub your stain colour of choice on the wood. After approximately 5 minutes, wipe excess stain off. Repeat if needed. We used Varathane Classic Penetrating Oil-Based Wood Stain in Special Walnut. 

Once the stain is dry, fasten the two pieces together. You can fasten with a screw, or by simply adding wood glue. Allow to dry before putting your pot on the stand. 

And, voila! Your mid-century modern plant stand, all for under $55!

Let’s break down the cost…

Rust-Oleum Painter’s Touch 2x Ultra Cover Paint + Primer (flat white) - $8.97
Pot (thrifted) - $4.99 
Behr Marquee Ultra Pure White Semi-Gloss Paint Sample w/ Primer - $4.97

1x2x6 Select Pine - $4.18
1x2x8 Select Pine - $5.80
Alexandria Moulding Hardwood 3/8’’x 2’’ Dowel Pins (bag of 18) - $4.83
Varathane Classic Penetrating Oil-Based Wood Stain (Special Walnut) - $9.47
HUSKY Steel Butt Wood Chisel - 1/2’’ - $9.47

Total Cost (plant stand + custom post) = $52.68

Note: All items, unless otherwise noted, were purchased from the Home Depot Canada. Items without a cost or not listed we already had at home. Total cost in Canadian dollars, not including tax. Prices and availability may vary depending on location.

Mid Century Modern Plant Stand DIY

The project supplies themselves were fairly inexpensive. The biggest cost was our time. While we love the final project, it did take a bit of time to finish. Between painting the pot, allowing it to dry, cutting, drilling, gluing, staining, drying and joining the wood, the project was completed over a few days. 

It must also be noted, while I would love to say this was an easy project it did  cause a few headaches. All of the tutorials I came across on the internet said it was easy. But it wasn’t. Maybe it was the tools we were using, maybe it wasn’t. But despite this costing us less than $55 to make, I started to understand why the fancy retailers charge well over that. It took a bit of trial and error in terms of the best way to attach the legs to the cross piece the pot would rest on, and ensure it held.

But that being said, despite the trial and error, we finally go it and are so happy with the newest addition to our (growing) plant collection!

Now, onto the next project…

Have you done any home DIYs lately? I’d love to hear what it was!


Disclosure: I received product and/or compensation in exchange for this post. However, all opinions are 100% that of To & Fro. Thank you Home Depot!

PIN IT:

Mid Century Modern Plant Stand DIY

SHARE:

October 10, 2019

And Then There Were Four: Becoming a Two Kid Family


You’ve got this!” Three words I would hear all the time when pregnant with my second child. They were almost always followed by, “You already have a little one, what more could you need to know?

Truth is, when we found out we were pregnant with our second, I was nervous. I was MORE nervous for number two than I was when pregnant with our first.

I knew having a baby would change things. Our social life would change, our routines would change and even our relationship would change. I knew that was inevitable.

But with baby number two, I didn’t know what to expect. We were so cozy as a little family of three, how would our established rhythm change? The unknown of becoming a two kid family was what made me nervous.

preschooler playing with magnetic tiles

Since little sister’s birth late summer 2018, it’s safe to say things are definitely different. Things have changed in ways that I did expect, and ways that I could not have expected. Some of the things that have changed I absolutely love, and some are still up for debate. Some things we knew how to handle, and some things we had to learn from scratch.

But the truth is, kids don’t come with a user manual. Regardless of having one, two, three or ten, being a parent is a “learn on the job” kind of role. 

Adjusting to the challenges that come with growing your family is also something you must learn as you go.

kids playing with magnetic tiles

I’m no expert, but here are just a few of the things that I’ve learned in the past 14(ish) months since becoming a family of four. 

Kids are different. Seems like a no brainer right? I knew they would be different, but I don’t think I knew just HOW different they’d be. The second child is never the same as the first, and you must start all over again. What may be true for one, may not be for the other. There are clear differences between them, and you must learn to adapt and change (or relearn) your way of thinking.

Take sleeping for example…

Exhaustion is real. Not to toot my own horn, but my oldest daughter was a pretty good sleeper when she was a baby. We knew she was setting the bar high in the sleep department, but didn’t know by how much. Little sister? Not the best. Definite room for improvement. I now know the true meaning of sleep deprivation.

Privacy does not exist. Think you didn’t get alone time before? Ha! There is NO such thing as alone when you have more than one child. In the shower, sitting on the toilet, brushing your teeth, making dinner - now there will always be someone right there beside you demanding your attention. Yes, even if dad is home. 

kids playing with magnetic tiles

And with the lack of privacy comes…

You’ll never have enough hands. Honestly. My oldest needs a snack at the most inconvenient of times - when I started cutting raw chicken for dinner, when I’m in the bathroom, when I started feeding her sister (weird, eh?). And it’s not just a, “I would like a snack”. No, it’s a full on, “I need a snack now or I may starve to death.” One hand per child is not enough.

Time is a thief. I’m sure you’ve heard the saying, “The days are long, but the years fly by.” I knew this was true with baby number one, but since having number two, I live it every day. I feel like I’ve time travelled through the past year an a bit, and know that time won’t be slowing down any time soon.

kids playing with magnetic tiles

Don’t mess with sibling love. Being the oldest of three, I understand the strong bond siblings share. But being able to sit back and watch it grow, is something truly special. While their love for each other wasn’t immediate, and they have their odd spats (which for right now include their fair share of grabbing, scratching and hair pulling), their relationship is amazing. The way they look at each other, make each other laugh and talk to each other in their ‘secret’ language that only they can understand, has made my heart swell to a size I never knew was possible.

And with that special relationship comes…

Sharing is caring. I’m happy my oldest knows how to share with her little sister, but having more than one child has taken sharing to a whole new level. This includes sharing illness. When it comes to sharing germs, no thank you. 
toddler playing with magnetic tiles

With big sister in preschool, I knew her bringing home germs was inevitable, but what I didn’t know was that it would be a constant cycle of cough, sneeze, rrunny nose, regardless of the season.

While there may be a lot of things to learn with being a family of four, one thing we can rely on is Children's Advil. In families with children in school, the number of colds per child can be as high as 12 a year (1)! So, when big sister comes home with a bug, Children’s Advil (for children age 2-12 years) provides her with up to 8 hours of fever relief so that she can get back to being a kid.

Life with a preschooler and toddler isn’t always easy, but it’s our new normal. It’s going to be a hard journey to raise these strong little ladies. I know I won’t end every day with a smile, but I’m ready for the challenge.

Do you have two or more kids? What’s the ONE piece of advice you would give to someone growing their family? I’d love to hear!


*Disclosure: I have partnered with Children’s Advil and have received compensation for this post. As always, all opinions and experiences are 100% that of To & Fro. Be sure this product is right for your kids, always read and follow the label.


References:
1. https://www.webmd.com/cold-and-fly/common_cold_overview 


PIN IT:

Things I've Learned Since Becoming a Two Kid Family


SHARE:
Blog Design Created by pipdig